Difference between revisions of "Docker"
| Line 14: | Line 14: | ||
Before you install the Docker Desktop WSL 2 backend, you must complete the following steps: | Before you install the Docker Desktop WSL 2 backend, you must complete the following steps: | ||
*Install Windows 10, version 1903 or higher or Windows 11. | *Install Windows 10, version 1903 or higher or Windows 11. | ||
*Enable WSL 2 feature on Windows. For detailed instructions, refer to the Microsoft documentation. | *Enable WSL 2 feature on Windows. For detailed instructions, refer to the Microsoft documentation. https://docs.microsoft.com/en-us/windows/wsl/install | ||
*Download and install the Linux kernel update package. | *Download and install the Linux kernel update package. | ||
To check your current WSL version, open the Powershell or CMD and run: | |||
::<code>wsl -l -v</code> | |||
==== Docker Hub ==== | ==== Docker Hub ==== | ||
Latest revision as of 07:06, 28 March 2022
About Docker[edit]
Docker is a set of platform as a service (PaaS) products that use OS-level virtualization to deliver software in packages called containers. The service has both free and premium tiers. The software that hosts the containers is called Docker Engine. It was first started in 2013 and is developed by Docker, Inc. Docker helps developers bring their ideas to life by conquering the complexity of app development. We simplify and accelerate development workflows with an integrated dev pipeline and through the consolidation of application components. Actively used by millions of developers around the world, Docker Desktop and Docker Hub provide unmatched simplicity, agility and choice.
Docker is an open platform for developing, shipping, and running applications. Docker enables you to separate your applications from your infrastructure so you can deliver software quickly. With Docker, you can manage your infrastructure in the same ways you manage your applications. By taking advantage of Docker’s methodologies for shipping, testing, and deploying code quickly, you can significantly reduce the delay between writing code and running it in production.
Docker Desktop[edit]
Docker Desktop is an easy-to-install application for your Mac or Windows environment that enables you to build and share containerized applications and microservices. Docker Desktop includes Docker Engine, Docker CLI client, Docker Compose, Docker Content Trust, Kubernetes, and Credential Helper.
Note about Docker Desktop for Windows!
Before you install the Docker Desktop WSL 2 backend, you must complete the following steps:
- Install Windows 10, version 1903 or higher or Windows 11.
- Enable WSL 2 feature on Windows. For detailed instructions, refer to the Microsoft documentation. https://docs.microsoft.com/en-us/windows/wsl/install
- Download and install the Linux kernel update package.
To check your current WSL version, open the Powershell or CMD and run:
wsl -l -v
Docker Hub[edit]
Docker Hub is a hosted repository service provided by Docker for finding and sharing container images with your team.
Key features include:
- Private Repositories: Push and pull container images.
- Automated Builds: Automatically build container images from GitHub and Bitbucket and push them to Docker Hub.
- There are over 100 Official Images like Postgres, Ubuntu, Alpine, Node, Redis, Ruby and much more free to download.
What is a Container?[edit]
Simply, a container is a sandboxed process on your machine that is isolated from all other processes on the host machine. That isolation leverages kernel namespaces and cgroups, features that have been in Linux for a long time. Docker has worked to make these capabilities approachable and easy to use.
To summarize, a container:
- is a runnable instance of an image. You can create, start, stop, move, or delete a container using the DockerAPI or CLI.
- can be run on local machines, virtual machines or deployed to the cloud.
- is portable (can be run on any OS)
- Containers are isolated from each other and run their own software, binaries, and configurations.
What is an Docker Image?[edit]
When running a container, it uses an isolated filesystem. This custom filesystem is provided by a container image. Since the image contains the container’s filesystem, it must contain everything needed to run an application - all dependencies, configuration, scripts, binaries, etc. The image also contains other configuration for the container, such as environment variables, a default command to run, and other metadata. An image is a read-only template with instructions for creating a Docker container. Often, an image is based on another image, with some additional customization. For example, you may build an image which is based on the ubuntu image, but installs the Apache web server and your application, as well as the configuration details needed to make your application run.
You might create your own images or you might only use those created by others and published in a registry. To build your own image, you create a Dockerfile with a simple syntax for defining the steps needed to create the image and run it. Each instruction in a Dockerfile creates a layer in the image. When you change the Dockerfile and rebuild the image, only those layers which have changed are rebuilt. This is part of what makes images so lightweight, small, and fast, when compared to other virtualization technologies.
Get Started[edit]
This tutorial assumes you have a current version of Docker installed on your machine. If you do not have Docker installed, choose your preferred operating system download and install:
Download Docker here: https://www.docker.com/get-started/
After installing, open a command prompt or bash window, and run the command:
$ docker run -d -p 80:80 docker/getting-started
Some infos about the used flags:
-d- run the container in detached mode (in the background)-p 80:80- map port 80 of the host to port 80 in the containerdocker/getting-started- the image you want to use
Congratulations! You have started the container for this tutorial!
The Docker Desktop Dashboard[edit]
The Docker Dashboard gives you a quick view of the containers running on your machine. It gives you quick access to container logs, lets you get a shell inside the container, and lets you easily manage container lifecycle (stop, remove, etc.).
To access the dashboard, follow the instructions for either Mac or Windows. If you open the dashboard now, you will see this tutorial running! The container name is a randomly created name.
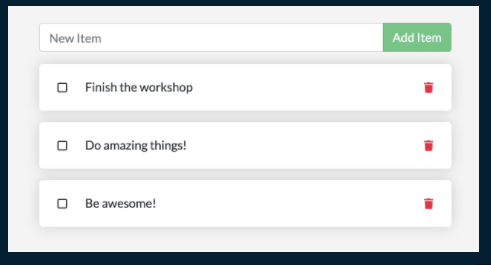
For the rest of this tutorial, we will be working with a simple todo list manager that is running in Node.js. Provided from the Docker Team.
Getting the app for this tutorial[edit]
Before we can run the application, we need to get the application source code onto our machine. For real projects, you will typically clone the repo. But, for this tutorial, the Docker Team has created a ZIP file containing the application.
- Go to http://localhost/assets/app.zip and download it. (This only works when you run the above command
docker run) - Extract the .zip file and open it in your prefered IDE.
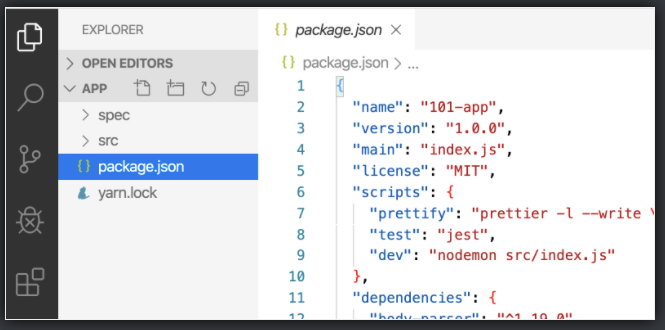
Now you should see the package.json File and two subdirectories "src" and "spec"
Building the Apps's Container Image[edit]
In order to build the application, we need to use a Dockerfile. A Dockerfile is simply a text-based script of instructions that is used to create a container image.
- Create a filed called Dockerfile in the same directory as the package.json file, make sure you don't have the .txt file extension
- Insert the following contents:
FROM node:12-alpine
RUN apk add --no-cache python2 g++ make
WORKDIR /app
COPY . .
RUN yarn install --production
CMD ["node", "src/index.js"]
Open a Terminal in the app directory and run the command:
docker build -t getting-started .
Note:
- The "." at the end of the docker build command tells that Docker should look for the Dockerfile in the current directory.
- The
-tflag tags our image. Think of this simply as a human-readable name for the final image. Since we named the image getting-started, we can refer to that image when we run a container.
Now you have created your first Container Image, you can start your Container with the following command:
docker run -dp 3000:3000 getting-started
After a few seconds, open your web browser to http://localhost:3000. You should see our app!
Updating our App[edit]
As a small feature request, we've been asked by the product team to change the "empty text" when we don't have any todo list items. They would like to transition it to the following:
- "You have no todo items yet! Add one above!"
- In the src/static/js/app.js file, update line 56 to use the new empty text.
- Build the updated version again with the same command we use before
docker build -t getting-started .
- Let's start a new container using the updated code.
docker run -dp 3000:3000 getting-started
Uh oh! You probably saw an error like this
So, what happened? We aren't able to start the new container because our old container is still running. The reason this is a problem is because that container is using the host's port 3000 and only one process on the machine (containers included) can listen to a specific port. To fix this, we need to remove the old container.
Replacing our Old Container[edit]
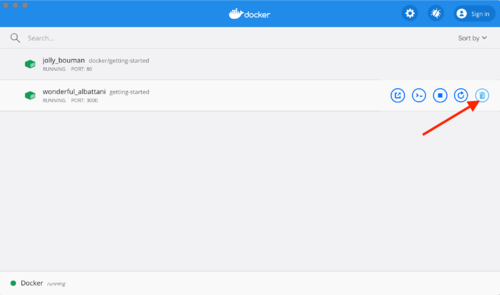
To remove a container, it first needs to be stopped. Once it has stopped, it can be removed. We have two ways that we can remove the old container. Feel free to choose the path that you're most comfortable with.
Removing a container using the CLI[edit]
- Get the ID of the container by using the docker ps command
docker ps
- Use the docker stop command to stop the container
docker stop
- Once the container has stopped, you can remove it with docker rm
docker rm <the-container-id>
Removing a container using the Docker Dashboard[edit]
Now you can start your updated app again.
docker run -dp 3000:3000 getting-started
Sharing our App[edit]
Now that we've built an image, let's share it! To share Docker images, you have to use a Docker registry. The default registry is Docker Hub and is where all of the images we've used have come from.
Create a Repo[edit]
To push an image, we first need to create a repo on Docker Hub.
- Go to https://hub.docker.com/ and log in if you need to.
- Click the Create Repository button.
- For the repo name, use getting-started. Make sure the Visibility is Public
- Click the Create button.
If you look on the right-side of the page, you'll see a section named Docker commands. This gives an example command that you will need to run to push to this repo.
Pushing our Image[edit]
In the command line, try running the push command you see on Docker Hub. Note that your command will be using your namespace, not "docker".
docker push YOUR-USER-NAME/getting-started
Running our Image on a New Instance[edit]
Now that our image has been built and pushed into a registry, let's try running our app on a brand new instance that has never seen this container image! To do this, we will use Play with Docker.
- Open your browser to play with your Docker Instance https://labs.play-with-docker.com/
- Log in with your Docker Hub account.
- Once logged in click "+ADD NEW INSTANCE" button on the left side and run your freshly pushed app.
docker run -dp 3000:3000 YOUR-USER-NAME/getting-started
Hooray!
As a reminder, we noticed that when we restarted the app, we lost all of our todo list items. That's obviously not a great user experience, so let's learn how we can persist the data across restarts!
Persisting our DB[edit]
In case you didn’t notice, our todo list is being wiped clean every single time we launch the container. Why is this? Let’s dive into how the container is working.
The Container's Filesystem[edit]
When a container runs, it uses the various layers from an image for its filesystem. Each container also gets its own "scratch space" to create/update/remove files. Any changes won't be seen in another container, even if they are using the same image.
Seeing this in Practice[edit]
To see this in action, we're going to start two containers and create a file in each. What you'll see is that the files created in one container aren't available in another.
- Start a ubuntu container that will create a file named /data.txt
- run:
docker run -d ubuntu bash -c "shuf -i 1-10000 -n 1 -o /data.txt && tail -f /dev/null"
- run:
In case you’re curious about the command, we’re starting a bash shell and invoking two commands (why we have the &&). The first portion picks a single random number and writes it to /data.txt. The second command is simply watching a file to keep the container running.
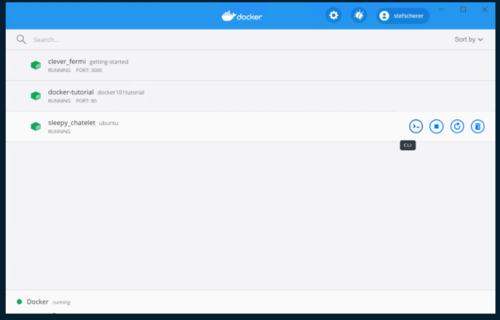
- Validate that we can see the output by execing into the container. To do so, open the Dashboard and click the first action of the container that is running the ubuntu image.
You will see a terminal that is running a shell in the ubuntu container. Run the following command to see the content of the /data.txt file. Close this terminal afterwards again.
- run:
cat /data.txt
- run:
If you prefer the command line you can use the docker exec command to do the same. You need to get the container’s ID (use docker ps to get it) and get the content with the following command.
- run:
docker exec <container-id> cat /data.txt
- run:
You should see a random number!
- Now, let’s start another ubuntu container (the same image) and we’ll see we don’t have the same file.
- run:
docker run -it ubuntu ls /
- run:
And look! There’s no data.txt file there! That’s because it was written to the scratch space for only the first container.
- Go ahead and remove the first container using the:
docker rm -f <container-id>command.
Container volumes[edit]
With the previous experiment, we saw that each container starts from the image definition each time it starts. While containers can create, update, and delete files, those changes are lost when the container is removed and all changes are isolated to that container. With volumes, we can change all of this.
Volumes provide the ability to connect specific filesystem paths of the container back to the host machine. If a directory in the container is mounted, changes in that directory are also seen on the host machine. If we mount that same directory across container restarts, we’d see the same files.
There are two main types of volumes. We will eventually use both, but we will start with named volumes.
Persist the todo data[edit]
By default, the todo app stores its data in a SQLite Database at /etc/todos/todo.db in the container’s filesystem. If you’re not familiar with SQLite, no worries! It’s simply a relational database in which all of the data is stored in a single file. While this isn’t the best for large-scale applications, it works for small demos. We’ll talk about switching this to a different database engine later.
With the database being a single file, if we can persist that file on the host and make it available to the next container, it should be able to pick up where the last one left off. By creating a volume and attaching (often called “mounting”) it to the directory the data is stored in, we can persist the data. As our container writes to the todo.db file, it will be persisted to the host in the volume.
As mentioned, we are going to use a named volume. Think of a named volume as simply a bucket of data. Docker maintains the physical location on the disk and you only need to remember the name of the volume. Every time you use the volume, Docker will make sure the correct data is provided.
- Create a volume by using this command:
docker volume create todo-db
- Stop and remove the todo app container once again in the Dashboard (or with docker rm -f <id>), as it is still running without using the persistent volume.
- Start the todo app container, but add the -v flag to specify a volume mount. We will use the named volume and mount it to /etc/todos, which will capture all files created at the path.
docker run -dp 3000:3000 -v todo-db:/etc/todos getting-started
- Once the container starts up, open the app and add a few items to your todo list.
- Stop and remove the container for the todo app. Use the Dashboard or docker ps to get the ID and then docker rm -f <id> to remove it.
- Start a new container using the same command from above.
- Open the app. You should see your items still in your list!
Hooray! You’ve now learned how to persist data!
Ressources[edit]
- Docker Documentation:
- Official Oracle Linux Image:
- Official mySql Image:
- Official Redis Image:
- Official couchbase Image:
- Official mariaDB Image:


